(NestJS -3) Integrating TypeORM with MySql in NestJS
This article will guide you through the steps needed to set up TypeORM with MySQL in a NestJS project in various ways. We will cover everything from the initial configuration to advanced usage, ensuring you have a comprehensive understanding of how to leverage these tools effectively in your application.
If you’re new to NestJS or need a refresher on its basics, we recommend checking out our previous article, “Getting Started with NestJS.” It provides a solid foundation that will help you follow along more easily with this guide.
Additionally, we will show you how to configure your project to access environment variables, building upon the configurations we discussed in our previous article. This will enable you to manage sensitive information and configuration settings securely and efficiently.
By the end of this article, you will have a well-configured NestJS project that uses TypeORM and MySQL, ready to handle complex database operations.
Advantages of using TypeORM
- It supports various types of database like MYSQL, SQLITE, MongoDB and soon.
- It is helpful for developers to write queries in an object oriented way instead of writing in SQL.
- It helps the developer to manage schema, migrations and relationships between tables.
- It can be easily configured and used.
- It can support small and large applications.
- It reduces development time a lot.
- You can use query builders for advanced database operations.
Prerequisites
Before we begin, ensure you have the following installed on your machine:
- Node.js (version >= 16)
- NPM
- MySQL server
- A basic NestJS application (refer to our article “Getting Started with NestJS” if needed)
Note: This article is a continuation of the previous article.
Mysql Setup
- Log in to MySQL: Open your command line interface (CLI) and log in to MySQL as the root user or another user which has the necessary privileges to create a database.
mysql -u root -p- Create database: You can create a new database with the following command.
CREATE DATABASE [database-name]; # I have created nestjs as database- Show databases: To list all databases use the below command.
show databases; //you can list extsting databasesFor extra security, Create new Database use and grant the permissions for only created database
Setup Environment Variables and Configurations
Simple, It a file has confidential data values as a key-value pair.
Now, Create a .env file in the root directory of your application and define the environment variables as follows:
APPNAME = 'NestJS-Application'
APPVERSION = 'v1.0'
APP_PORT = 4000

DB_HOST = 'localhost'
DB_PORT = 3306
DB_USERNAME = 'root'
DB_PASSWORD = 'root'
DATABASE = 'nestjs'
DB_SYNC = true // make false in production
Install, dotenv package module to access variables in application:
$ npm install --save dotenvwe can use access the data using process.env.<key> For different different environment setup file we have to config the file-path of file using config function in dotenv. then we can directly access the data in regular way. Example as shown bellow:
import { NestFactory } from '@nestjs/core';
import { AppModule } from './app.module';
import { ConfigService } from '@nestjs/config';
import * as dotenv from 'dotenv';
dotenv.config({ path: process.cwd() + '/.env' });
// the cmd method will return the current working directory of the Node.js process.
// .env.development is a file which i am using for storing environmental variables.
// if you are using normal .env file, the above import and config steps are not required.


async function bootstrap() {
  const app = await NestFactory.create(AppModule);
  const configService = app.get(ConfigService);

  // Retrieving the application port from the configuration or using the default value of 3000
  const port = configService.get<number>('app.port', 3000); // Defaults to 3000 if not specified

  await app.listen(port);
  // Logging the application URL to confirm successful startup
  console.log(`This application is runnning on: ${await app.getUrl()}`)
}
bootstrap()
For more information visit my article how to setup and read
.envin different environments.
Configuring TypeORM with MySQL
Install TypeORM along with the MySQL driver:
$ npm install --save @nestjs/typeorm typeorm mysql2Note: Use any one method to config TypeOrm.
1. Direct Configuration in app.module.ts
Open the app.module.ts file and configure TypeORM using MYSQL credentials:
import { Module } from '@nestjs/common';
import { AppController } from './app.controller';
import { AppService } from './app.service';
import { TypeOrmModule } from '@nestjs/typeorm';

@Module({
  imports: [
   TypeOrmModule.forRoot({
      type: 'mysql',// Specifying the database type as mysql and it also supports mariadb
      host: 'localhost',// Database host, in this case, it's localhost
      port: 3306,// Port number where the database is running, 3306 is the default for MySQL
      username: 'root',// Username for connecting to the database
      password: 'root',// Password for the database user
      database:'nestjs',// Name of the database to connect to
      synchronize: true,// Indicates if database schema should be auto created on every start
      autoLoadEntities: true,
      //Logger setings to log error's and warn's in the ORM.
      logger:'file',
      logging:["error"]
    }),
  ],
  controllers: [AppController],
  providers: [AppService],
})
export class AppModule { }
2. Using Environment Variables in app.module.ts
Open the app.module.ts file and configure TypeORM using credentials from environment variables:
import { Module } from '@nestjs/common';
import { AppController } from './app.controller';
import { AppService } from './app.service';
import { TypeOrmModule } from '@nestjs/typeorm';
import { MyConfigModule } from './config/config.module';

@Module({
  imports: [
    MyConfigModule,
    TypeOrmModule.forRoot({
      type: 'mysql', // Specifying the database type as mysql and it also supports mariadb
      // Replace env config names as you defines in file.
      host: process.env.DB_HOST,
      port: parseInt(process.env.DB_PORT),
      username: process.env.DB_USERNAME,
      password: process.env.DB_PASSWORD,
      database: process.env.DATABASE,
      synchronize: process.env.DB_SYNC == 'true',
      autoLoadEntities: true,
      //Logger setings to log error's and warn's in the ORM.
      logger: 'file',
      logging: ["error"]
    }),
  ],
  controllers: [AppController],
  providers: [AppService],
})
export class AppModule { }
Please ensure that the database user has the privilege to make changes in the database, and set synchronization to false in production environments, as well as in development if not required.
Creating a Module
Now, we will create new module, controller, service to handle the requested data and store it in database.
We can generate those files in 2 ways:
Note: Use any one way to generate resourses.
- Create individual files at single time. using below command:
# use module, controller, or service in place of file-type
$ nest g [file-type] product
2. Generate an entire module with CRUD endpoints use below command:
$ nest g resource productIf you choose the second step, select REST API as the transport layer and enter Y or YES to generate CRUD entry points, if not N or No. This will create multiple DTO files and entities for better readability.
Try to maintain the same module structure for all.
Define Entity
Entities are the building blocks of your database schema. Simply an entity object represents a database table, we define Entities to interact with the database.
Advantages of using entities
- It provide a way to abstract database tables into TypeScript classes, making it easier to work with databases using an object-oriented approach.
- It provides different decorators to ensure data integrity and consistency.
- It allow you to define relationships between different tables like (e.g., one-to-many, many-to-many).
- It simplifies to use database queries and operations.
To maintain a consistent naming convention for your entity files in a NestJS project, you should name them using the [module-name].entity.ts format.
The TypeORM provides an Entity decorator to define Entity. Also provides some decorators to define properties of data table columns like PrimaryColumn, Column and soon.
If you create a module with the CRUD generator try to use the entity file which is present in the entities folder within the module, if not create a file as product.entity.ts in the product directory and define the structure of the product table. Let’s see an example of an entity in the code below:
// product.entity.ts
import { Column, CreateDateColumn, DeleteDateColumn, Entity, PrimaryColumn, UpdateDateColumn } from "typeorm";

@Entity()
export class Product {
    @PrimaryColumn({ generated: "uuid" }) //it is used to generate primary id, when new data inserted.
    id:string;

    @Column() // It is used to mark a specific class property as a table column
    name: string;

    @Column()
    description: string;

    @Column({ type: 'decimal' })
    price: number;

    @CreateDateColumn()
    createdon:Date;

    @UpdateDateColumn()
    updatedon:Date;

    @DeleteDateColumn()
    deletedon:Date;
}
Note: Without the
@Entitydecorator, TypeORM will not recognize the class as an entity, and it won't map it to a database table.
We import the product entity in the product.module.ts and register it as an TypeORM Feature to use in application:
// product.module.ts
import { Module } from '@nestjs/common';
import { ProductService } from './product.service';
import { ProductController } from './product.controller';
import { TypeOrmModule } from '@nestjs/typeorm';
import { Product } from './entities/product.entity';  // the entity file path can be changed

@Module({
  imports: [TypeOrmModule.forFeature([Product])],
  controllers: [ProductController],
  providers: [ProductService],
})
export class ProductModule {}Note: If the synchronize is true it will automatically create tables in database, if table exist already it will create the columns which are defined in
productclass.
From here, we begin to write the business logic in our application.
CRUD Operations:
- Create: Add new data to the database.
- Read: Retrieve and view existing data.
- Update: Modify existing data.
- Delete: Remove data from the database.
We will perform these operations using the database.
Define DTO
The DTO (Data Transfer Objects) are used to define the data structure of user requested data.
Advantages of DTO
- Used to define the data structure of incoming and outgoing data.
- Used to define validation rules for incoming data.
- It makes code clean, easier to maintain.
- DTOs can be used to generate API documentation automatically.
The DTOs are also used to validate the
To maintain a consistent naming convention for DTO files in a NestJS project, name them using the [module-name].dto.ts format.
Some developers use multiple files in a single module folder by naming that group as dto folder, while others use a single file for the entire module.
Here, we will use only a single DTO file named product.dto.ts to specify the data structures for creating and updating products.
// dto/create-product.dto.ts

export class CreateProductDto {
  name: string;
  description: string;
  price: number;
}
// dto/update-product.dto.ts
import { PartialType } from '@nestjs/mapped-types';
import { CreateProductDto } from './create-product.dto';
export class UpdateProductDto extends PartialType(CreateProductDto) {
id: string;
}And I have updated the product.controller.ts to handle product ID as a string:
//product.controller.ts

import { Controller, Get, Post, Body, Param, Delete, Put } from '@nestjs/common';
import { ProductService } from './product.service';
import { CreateProductDto } from './dto/create-product.dto';
import { UpdateProductDto } from './dto/update-product.dto';

@Controller('product')
export class ProductController {
  constructor(
    private readonly productService: ProductService
  ) { }

  @Post()
  async create(@Body() createProductDto: CreateProductDto) {
    return this.productService.create(createProductDto);
  }

  @Get()
  async findAll() {
    return this.productService.findAll();
  }

  @Get(':id')
  async findOne(@Param('id') id: string) {
    return this.productService.findOne(id);
  }

  @Put()
  async update(@Body() updateProductDto: UpdateProductDto) {
    return this.productService.update(updateProductDto);
  }

  @Delete(':id')
  async remove(@Param('id') id: string) {
    return this.productService.remove(id);
  }
}
To use entities in service class, we inject it as repositories in constructor to perform database operations like shown in below code.
//product.service.ts

import { Injectable } from '@nestjs/common';
import { InjectRepository } from '@nestjs/typeorm';
import { Repository } from 'typeorm';
import { Product } from './entities/product.entity';
import { CreateProductDto } from './dto/create-product.dto';
import { UpdateProductDto } from './dto/update-product.dto';
@Injectable()
export class ProductService {
  constructor(
    @InjectRepository(Product)
    private readonly productRepo: Repository<Product>,
  ) { }

  async create(createProductDto: CreateProductDto): Promise<Product> {
    const newProduct = new Product(); //creating a product object to initialize its values
    newProduct.name = createProductDto.name;
    newProduct.description = createProductDto.description;
    newProduct.price = createProductDto.price;
    return await this.productRepo.save(newProduct); // saving the new product in product table
    //or you can use "insert" in place of save
  }

  async findAll(): Promise<Product[]> {
    return this.productRepo.find(); //returning all the products
  }

  async findOne(id: string): Promise<Product> {
    return this.productRepo.findOneBy({ id: id }) //returning a specific product
  }

  async update(updateProductDto: UpdateProductDto): Promise<string> {
    await this.productRepo.update(updateProductDto.id, updateProductDto); // updating the product
    return "Product updated sucessfullly";
  }

  async remove(id: string): Promise<string> {
    this.productRepo.delete({ id: id }); //deleting the product
    return "Product deleted successfully";
  }
}
In above example, we used a decorator InjectRepository and a class Repository.
- Repository: A
Repositoryin TypeORM is a class that allows you to manage and interact with a specific entity in your database. In this case, theUserMasterentity. A repository provides methods to perform common database operations like inserting, finding, updating, and deleting records. - Inject Repository: The
@InjectRepositorydecorator is used in NestJS to inject a repository for a specific entity. This decorator is part of the@nestjs/typeormpackage and is necessary because it allows NestJS to know which repository (entity) to inject into the service.
Also we used some TypeORM methods to do CRUD operations to manipulate data in database. Those methods are: save, find, update, delete. We will try to look deep into those methods in the upcoming article of this series.
We will discuss more about the CRUD operation in the upcoming article.
Run application
Make sure the MYSQL
synchronize: true or MYSQL_SYNC = trueto synchronize database.
Now start the application in the terminal or command prompt using the command below in the root directory path. This command will start the HTTP server on the port you have defined in the file:
$ npm run startwe have another command which will watch the file changes in the application and reload it on save:
$ npm run start:devIf application is running, you can use web browse or postman to test, use base request URLhttp://localhost:4000
When an application running the tables will be created if it does not exist, which we created as an entity in application.
You can cross check in the database using the below command:
$ mysql -p
$ use [database-name]; #example nestjs
$ show tables;
Issues
Database connectivity error.
ERROR [TypeOrmModule] Unable to connect to the database. Retrying (1)...
Error: connect ECONNREFUSED ::1:3306
    at __node_internal_captureLargerStackTrace (node:internal/errors:490:5)
    at TCPConnectWrap.afterConnect [as oncomplete] (node:net:1494:16)
Solution:
This error indicates that the connection to the database was refused, likely due to incorrect credentials, misconfiguration, or the database server not running. To resolve this issue:
I. Verify Database Server Status:
- for Linux:
Ensure the database server is running. You can check this with a command like:
# for linux environment
sudo systemctl status mysql
2. for Windows:
- Press
Win + R, typeservices.msc, and press Enter. - Look for the service named
MySQL. - Ensure the status is Running. If not, right-click the service and click Start.
II. Test Database Connectivity from Command Line:
Use the credentials configured in your application to log in via the command line:
mysql -h localhost -u <username> -p<password>Replace <username> and <password> with your actual credentials.
III. Check Database Host and Port:
Ensure the host and port in your TypeOrmModule configuration are correct.
Testing
If you already have Postman installed, open it. If not, you can download it from the official Postman website.
Create a new request in postman, select request type and add base request URL. Click on body and select raw then JSON format this is for post and put requests.
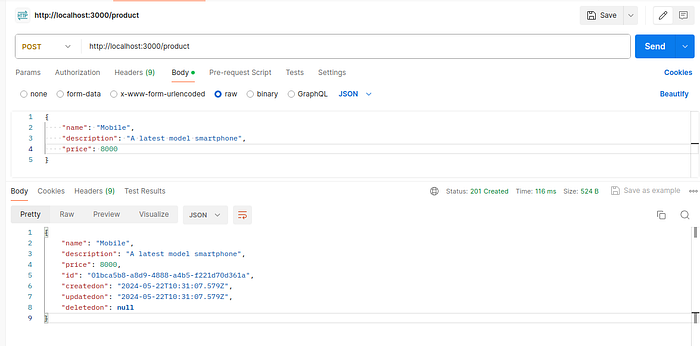
1.Add New Product
Now add the body for the request. The body structure should be same as which we have defined in CreateProductDto
{
  "name": "Computer",
  "description": "A high-performance desktop computer",
  "price": 12000
}
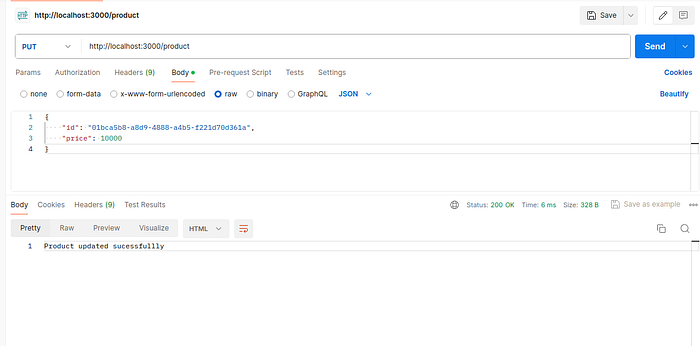
2. Updating existing product
Now, you can use same request by changing request type to put, or can create new request. In body the Id of product should be mandatory exists and it is same as while it has been created:
{
    "price": "15000",
    "id": "01bca5b8-a8d9-4888-a4b5-1221d70d361a"  #  id can be different
}
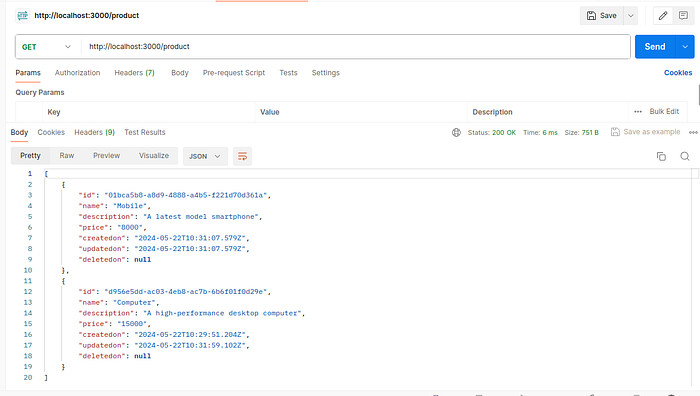
3. Get All Products
Retrieve all product.
4. Find single product with Id
Retrieving a product by ID.

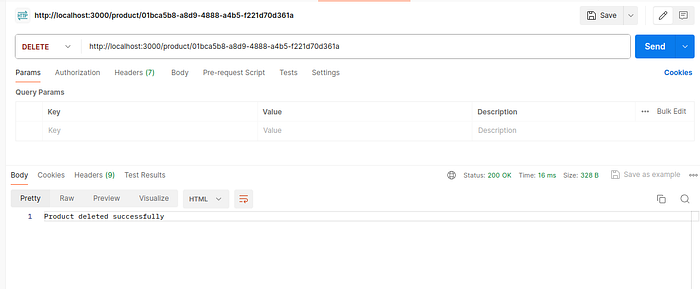
5. Delete the product
Deleting a product by ID.
Key Takeaways:
- Always use environment variables for sensitive configurations.
- Set
synchronizetofalsein production to avoid accidental schema changes. - Use DTOs for data validation and clarity.
- Inject repositories for clean and testable service logic.
- Leverage TypeORM decorators to define entities and relationships between tables.
For further exploration, you can add features like:
- Migrations: To manage schema changes.
- Soft Deletes: To mark data as deleted without physically removing it from the database.
- Advanced Queries: Using TypeORM’s QueryBuilder for complex operations.
Conclusion
With this setup, you should now have a fully functioning NestJS application integrated with TypeORM and MySQL.
In this article, we covered how to set up a NestJS application integrated with TypeORM and MySQL. Additionally, we explored using a custom config module with TypeORM.
Check out the next article to learn about configuring and using a logger.
To configure Custom config Module, refer to my previous article.
GitHub Repository:
You can find the complete code for this implementation on GitHub: bhargavachary123
Contribution
If you like my Article, please, consider donating through Buy Me a Coffee: https://buymeacoffee.com/bhargavachary.
If you found this article useful, please consider leaving a clap (👏) and a comment.
Thanks for reading this far!
