(NestJS-4) Configuring and using logger in different ways
In any robust application, logging is essential for tracking activities, debugging issues, and maintaining the system’s overall health. NestJS, a progressive Node.js framework, provides built-in support for logging. This article will guide you through the steps to set up a logger in your NestJS application, using both the built-in logger and an external library for more advanced features.
In this artical, Example we will the concets like:
- How to use NestJS Built-in logger.
- How to customize NestJS Built-in logger.
- Setting up Winston Logger with Customizations.
- Creating Daily Rotating Logger using Winston.
Advantages of Using a Logger
- Tracking Application Flow: Logs help in understanding the application’s flow by tracking each step of the process.
- Debugging: Efficient logging assists in identifying and fixing bugs by providing detailed error messages and stack traces.
- Monitoring and Maintenance: Logs are crucial for monitoring the application’s health and maintaining performance.
- Security: Logging can help detect security breaches and unauthorized access attempts.
Prerequisites
Before we begin, ensure you have the following installed on your machine:
- Node.js (version >= 16)
- A basic NestJS application (refer to our previous article “Getting Started with NestJS” if needed)
Note: This article is a continuation of the previous article.
Configuring the Logger
There are several ways to configure a logger in NestJS:
- Using the built-in logger directly. (Simple way)
- Using a customized built-in logger.
- Using external logger libraries like winston (My preferred way)
By using last way, we can use different log levels with different formats and also its my preferred way because it have so many advantages.
Using Built-in Logger
NestJS provides a built-in logger class in @nestjs/common that can be used directly without any additional setup. NestJS supports different logging levels:
- log: General information about application events.
- error: Indicates a significant problem that needs attention.
- warn: A warning about a potential issue or important situation.
- debug: Detailed information for diagnosing problems.
- verbose: Very detailed information, more than ‘debug’.
- fatal: Critical issue causing the application to stop.
NestJS Build-In logger is only used to log in console or terminal
The logger levels will take two arguments: 1. message 2. context(it can be an array of a string). The context is optional.
- With Out Logger Context
// src/main.ts
/* imports */
async function bootstrap() {
  const app = await NestFactory.create(AppModule);
  const configService = app.get(ConfigService);

  // Retrieving the application port from the configuration or using the default value of 3000
  const port = configService.get<number>('app.port', 3000); // Defaults to 3000 if not specified

  await app.listen(port);
  // Logging the application URL to confirm successful startup
  const logger = new Logger();
  logger.debug(`This application is runnning on: ${await app.getUrl()}`, "Bootstrap")
}
bootstrap()
// ./app.controller.ts
// you can also use same implementation in service and controller files
import { Controller, Get, Ip, Logger } from '@nestjs/common';
import { AppService } from './app.service';

@Controller()
export class AppController {
  private readonly logger = new Logger();
  constructor(
    private readonly appService: AppService
  ) {}

  @Get()
  getHello(@Ip() Ip:string): string {
    this.logger.log(`GetHello call from Ip: ${Ip}`);
    return this.appService.getHello();
  }
}
Start the application:
$ npm run start:dev
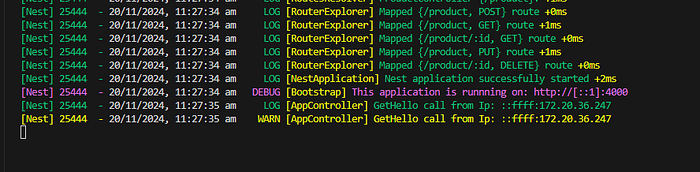
In main.ts, the NestFactory.create method will accept optional arguments like logger, cors, httpsOptions, and more. The logger as some of the options which are used to override the default logger, set an array of log levels, or provide a boolean value false to disable the logger.
// src/main.ts
/* imports */
async function bootstrap() {
  const app = await NestFactory.create(AppModule,{
    logger: ["error", "warn", "debug"] // if will accept boolean or array of levels or custom logger service
  });

  /* other code if exists */
  const configService = app.get(ConfigService);
  const port = configService.get<number>('app.port', 3000); // Defaults to 3000 if not specified
  await app.listen(port);

  Logger.log(`This application is runnning on: ${await app.getUrl()}`) //this is not been printed in console
}
bootstrap();
NestJS also provides methods to configure the application, such as useLogger, enableCors, useGlobalFilters, and more.
2. With Logger context
// src/main.ts
/* imports */
async function bootstrap() {
  const app = await NestFactory.create(AppModule);

  const configService = app.get(ConfigService);
  const port = configService.get<number>('app.port', 3000);
  await app.listen(port);

  const logger = new Logger("Bootstrap");
  logger.debug(`This application is runnning on: ${await app.getUrl()}`)
}
bootstrap();
// src/app.controller.ts
// you can also use same implementation in services
import { Controller, Get, Ip, Logger, Req } from '@nestjs/common';
import { AppService } from './app.service';
@Controller()
export class AppController {
private readonly logger = new Logger(AppController.name) ;
constructor(
private readonly appService: AppService
) {}
@Get()
getHello(@Req() req, @Ip() Ip:string): string {
this.logger.log(`GetHello call from Ip: ${Ip}`);
// secound way of using logger with out its object
Logger.warn(`GetHello call from Ip: ${Ip}`,AppController.name);
return this.appService.getHello();
}
}
Using customized build-in logger as a services
In this we will customize the log levels, log format. Create a folder as config and create a file in config folder as custom.logger.ts .
// config/custom.logger.ts
import { LoggerService, Injectable, ConsoleLogger } from '@nestjs/common';

@Injectable()
export class CustomLogger extends ConsoleLogger implements LoggerService {
  constructor(context?: string) {
    super();
    this.setLogLevels(['warn', 'error', 'debug']);
    this.setContext(context);
  }

  log(message: string) {
    // Add custom log formatting or logic
    super.log(message);
  }

  error(message: string) {
    // Add custom error handling
    super.error(message)
  }

  warn(message: string) {
    // Add custom warning handling
    super.warn(message);
  }

  debug(message: string) {
    // Add custom debug handling
    super.debug(message);
  }

  verbose(message: string) {
    // Add custom verbose handling
    super.verbose(message);
  }
}- With overriding build-in logger
// src/main.ts
/* imports */
async function bootstrap() {
const app = await NestFactory.create(AppModule);
app.useLogger(new CustomLogger())
const configService = app.get(ConfigService);
// Retrieving the application port from the configuration or using the default value of 3000
const port = configService.get<number>('app.port', 3000); // Defaults to 3000 if not specified
await app.listen(port);
Logger.error(`Application is running on: ${await app.getUrl()}`);
Logger.warn(`Application is running on: ${await app.getUrl()}`);
}
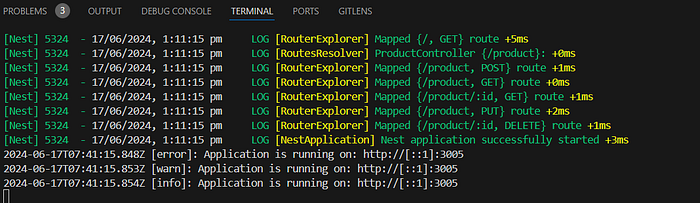
bootstrap();In console we can only see warn and error log levels, because we configured only 2 log levels .

2. Without overriding build-in logger
// src/main.ts
/* imports */
async function bootstrap() {
  const app = await NestFactory.create(AppModule);

  const configService = app.get(ConfigService);
  // Retrieving the application port from the configuration or using the default value of 3000
  const port = configService.get<number>('app.port', 3000); // Defaults to 3000 if not specified
  await app.listen(port);

  const customlogger = new CustomLogger('Bootstrap') // the string indicates the logLocation
  customlogger.error(`Application is running on: ${await app.getUrl()}`);
  customlogger.debug(`Application is running on: ${await app.getUrl()}`);
  customlogger.warn(`Application is running on: ${await app.getUrl()}`);
}
bootstrap();
If you follow the above steps, we can use both the built-in and custom loggers simultaneously. The major disadvantage of using this method is that we can’t disable the logger at the application level. For example:
const app = await NestFactory.create(AppModule, { logger:false } );Using external Logger libraries
While the built-in logger is useful, the logs will be cleared when the application is restarted. You might encounter situations where you need to review the previous logs. By using an external library, you can gain access to advanced features such as logging to a file, different log levels, custom log formats, and prioritizing log levels. There are various modules available on NPM like Pino, Winston, Morgan, Bunyan, and more.
In this example, we will integrate Winston, a versatile logging library. It supports multiple transports and also we can config different log levels for each.
Step-1: Install Winston library Dependence
$ npm install winston --saveWe can integrate Winston logger as an a separate service or a simple log file.
Step-2: Integrating Winston library as a service
Create a folder as config if not exists and create a file in config folder as winston.logger.ts .
//config/winston.logger.ts

import { Injectable } from '@nestjs/common';
import * as winston from 'winston';
import * as path from 'path';

@Injectable()
export class WinstonLogger {
  private readonly logger: winston.Logger;

  constructor() {
    const logDir = path.join(process.cwd(), 'logs');

    this.logger = winston.createLogger(
      {
      format: winston.format.combine(
        winston.format.timestamp(),
        winston.format.printf(({ timestamp, level, message }) => {
          return `${timestamp} [${level}]: ${message}`;
        }),
      ),
      transports: [
        new winston.transports.File({
          filename: 'application.log',
          dirname: logDir,
        }),
      ],
    });

    if(process.env.NODE_ENV !== 'production'){   // APP_ENV is accessed from env file
      this.logger.add( new winston.transports.Console())
    }
  }

  error(message: string, trace?: string) {
    this.logger.error(`${message} - ${trace}`);
  }

  warn(message: string) {
    this.logger.warn(message);
  }

  debug(message: string) {
    this.logger.debug(message);
  }

  info(message: string) {
    this.logger.info(message);
  }
}
In the code above, we defined a WinstonLogger class. In the constructor, we configured the Winston logger using the winston.createLogger method. This method supports various options to configure the logger as we wish. We configured the logging format and different transports. We also defined some log methods to log messages.
To use the above custom logger in the main function, controller, and service, we need to create an instance of it and use its methods to log messages.
// src/main.ts
/* imports */
async function bootstrap() {
  const app = await NestFactory.create(AppModule);

  const configService = app.get(ConfigService);
  // Retrieving the application port from the configuration or using the default value of 3000
  const port = configService.get<number>('app.port', 3000); // Defaults to 3000 if not specified
  await app.listen(port);
  // Logging the application URL to confirm successful startup
  const logger = new WinstonLogger();
  const appUrl = await app.getUrl();
  logger.error(`Application is running on: ${appUrl}`,"Bootstrap");
  logger.warn(`Application is running on: ${appUrl}`);
  logger.info(`Application is running on: ${appUrl}`);
  logger.debug(`Application is running on: ${appUrl}`);
}
bootstrap()
// src/app.controller.ts
import { Controller, Get, Ip } from '@nestjs/common';
import { AppService } from './app.service';
import { WinstonLogger } from './config/custom.logger';
@Controller()
export class AppController {
private readonly winstonlogger = new WinstonLogger();
constructor(
private readonly appService: AppService,
) {}
@Get()
getHello(@Ip() Ip:string): string {
this.winstonlogger.info(`GetHello call from Ip: ${Ip}`);
return this.appService.getHello();
}
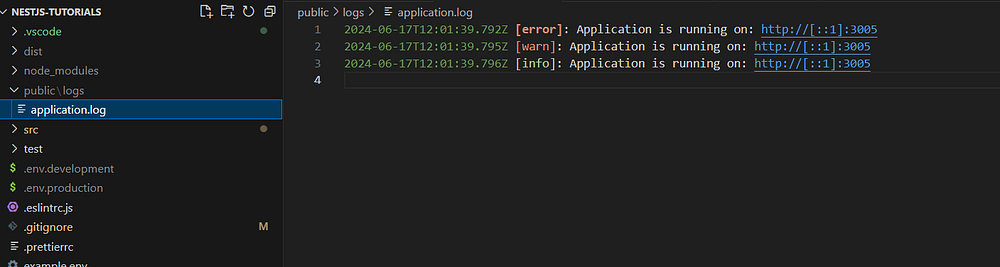
}Now start the application by using the command npm start or npm run start:dev. The log file will be created in the public/logs folder. In the main function, we defined 4 log levels, but by default, only 3 log levels are logged: error, warn, and info.
In Winston, we can prioritize log levels and it has some extra log levels. The log levels are divided into two parts:
- CLI and NPM log levels are: error, warn, info, debug, http, verbose, input, silly, data, help, prompt.
- System log levels are: emerg, alert, crit, notice
Note: Default log levels priority in Winston
emerg: 0, alert: 1, crit: 2, error: 3, warning: 4, notice: 5, info: 6, debug: 7
Now, we will define all the above log levels and configure their priorities and colors.
//config/winston.logger.ts

import { Injectable } from '@nestjs/common';
import * as path from 'path';
import * as winston from 'winston';

const customLevels = {
  levels: {
    error: 0,
    warn: 1,
    info: 2,
    debug: 3,
    http: 4,
    verbose: 5,
    input: 6,
    silly: 7,
    data: 8,
    help: 9,
    prompt: 10,
    emerg: 11,
    alert: 12,
    crit: 13,
    notice: 14,
  },
  colors: {
    error: 'red',
    warn: 'yellow',
    info: 'green',
    debug: 'blue',
    http: 'magenta',
    verbose: 'cyan',
    input: 'grey',
    silly: 'magenta',
    data: 'white',
    help: 'cyan',
    prompt: 'grey',
    emerg: 'red',
    alert: 'yellow',
    crit: 'red',
    notice: 'blue',
  },
};

@Injectable()
export class WinstonLogger {
  private readonly logger: winston.Logger;

  constructor() {
    const logDir = path.join(process.cwd(), 'logs');

    this.logger = winston.createLogger(
      {
      level: 'notice', // Set log level according to usage
      levels: customLevels.levels,
      format: winston.format.combine(
        winston.format.timestamp(),
        winston.format.colorize({ all:true, colors: customLevels.colors }),
        winston.format.printf(({ timestamp, level, message }) => {
          return `${timestamp} [${level}]: ${message}`;
        }),
      ),
      transports: [
        new winston.transports.File({
          level: 'data',
          filename: 'application.log',
          dirname: logDir,
          format: winston.format.uncolorize(),
        })
      ],
    });
    if(process.env.NODE_ENV !== 'production'){
      this.logger.add(
        new winston.transports.Console()
      )
    }
  }

  // for cli and npm levels
  error(message: string, trace?: string) {
    this.logger.error(trace ? `${message} - ${trace}` : message);
  }

  warn(message: string) {
    this.logger.warn(message);
  }

  help(message: string) {
    this.logger.help(message);
  }

  data(message: string) {
    this.logger.data(message);
  }

  info(message: string) {
    this.logger.info(message);
  }

  debug(message: string) {
    this.logger.debug(message);
  }

  prompt(message: string) {
    this.logger.prompt(message);
  }

  verbose(message: string) {
    this.logger.verbose(message);
  }

  http(message: string) {
    this.logger.http(message);
  }

  silly(message: string) {
    this.logger.silly(message);
  }

  input(message: string) {
    this.logger.input(message);
  }

  // for syslog levels only
  alert(message: string) {
    this.logger.alert(message);
  }

  crit(message: string) {
    this.logger.crit(message);
  }

  notice(message: string) {
    this.logger.notice(message);
  }

  emerg(message: string) {
    this.logger.emerg(message);
  }
}
// src/main.ts
/* imports */
async function bootstrap() {
const app = await NestFactory.create(AppModule);
const configService = app.get(ConfigService);
// Retrieving the application port from the configuration or using the default value of 3000
const port = configService.get<number>('app.port', 3000); // Defaults to 3000 if not specified
await app.listen(port);
// Logging the application URL to confirm successful startup
const logger = new WinstonLogger();
const appUrl = await app.getUrl();
// cli and npm levels
logger.error(`Application is running on: ${appUrl}`);
logger.warn(`Application is running on: ${appUrl}`);
logger.info(`Application is running on: ${appUrl}`);
logger.debug(`Application is running on: ${appUrl}`);
logger.http(`Application is running on: ${appUrl}`);
logger.verbose(`Application is running on: ${appUrl}`);
logger.input(`Application is running on: ${appUrl}`);
logger.silly(`Application is running on: ${appUrl}`);
logger.data(`Application is running on: ${appUrl}`);
logger.help(`Application is running on: ${appUrl}`);
logger.prompt(`Application is running on: ${appUrl}`);
// syslog level
logger.emerg(`Application is running on: ${appUrl}`);
logger.alert(`Application is running on: ${appUrl}`);
logger.crit(`Application is running on: ${appUrl}`);
logger.notice(`Application is running on: ${appUrl}`);
}
bootstrap();This is the outcomes of above code:
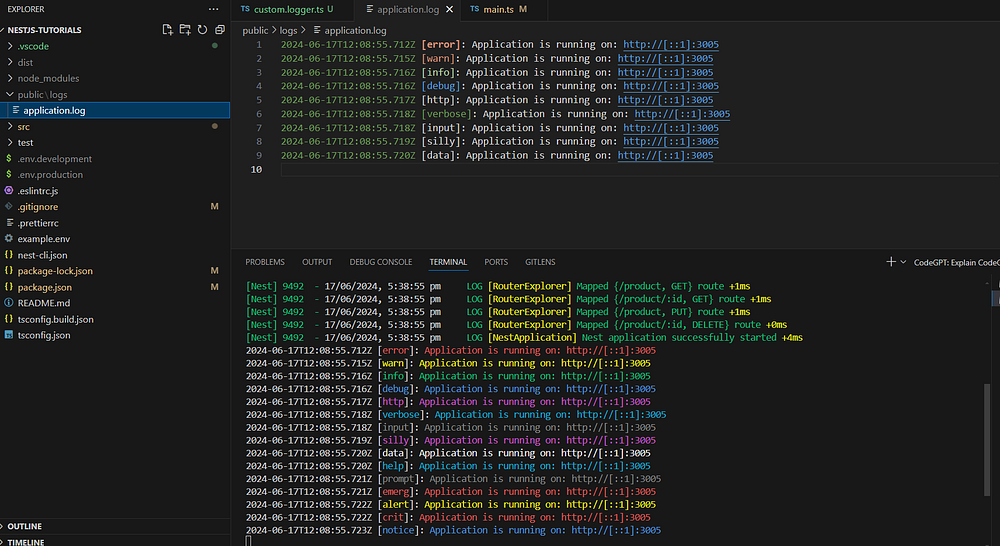
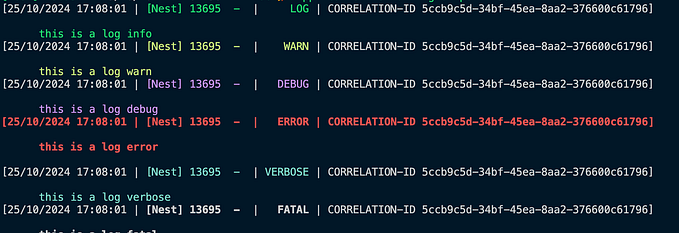
As you can see in the picture, the log file contains only 9 log levels, while the console shows 15 log levels. This discrepancy exists because the log level for the file is defined up to the data level, but globally it is defined up to the notice level. Therefore, logs from the error to data levels are printed, and levels below data are skipped.
For more information, please refer official library page.
Configuring Winston daily rotate logger file
The Winston Daily Rotate Logger creates log files on a daily basis.
Advantages:
- Log Rotation: Automatically manages log files by rotating them daily.
- Organized Logging: Facilitates finding and analyzing logs for specific days.
- Log Archiving and Cleanup: Ensures old logs are compressed to save space and automatically deleted after a specified period.
- Suitability for Production: Particularly useful in production environments.
Step-1: Install Required Package
$ npm install winston-daily-rotate-file --save Step 2: Configure Daily Rotate Logger
To configure it, you need to first integrate Winston as shown in above. Then, make necessary code changes to enable daily file rotation. Create a folder as config if not exists and create a file in config folder as winston.logger.ts if not exists.
//config/winston.logger.ts
import { Injectable } from '@nestjs/common';
import * as path from 'path';
import * as winston from 'winston';
import 'winston-daily-rotate-file';

/*
 config custom levels
*/

@Injectable()
export class WinstonLogger {
  private readonly logger: winston.Logger;

  constructor() {
    const logDir = path.join(process.cwd(), 'logs');

    this.logger = winston.createLogger(
      {
        level: 'notice', // Set log level to the least severe level to log everything
        levels: customLevels.levels,
        format: winston.format.combine(
          winston.format.ms(),
          winston.format.timestamp(),
          winston.format.colorize({ all: true, colors: customLevels.colors }),
          winston.format.printf(({ timestamp, level, message }) => {
            return `${timestamp} [${level}]: ${message}`;
          }),
        ),
        transports: [
          new winston.transports.DailyRotateFile({
            level: 'data',
            filename: 'rotate-%DATE%.log',
            dirname: logDir,
            format: winston.format.uncolorize(),
            zippedArchive: true,
            datePattern: 'YYYY-MM-DD',
            maxFiles: '20d',
            maxSize: '30m',
          })
        ],
      });
    if (process.env.NODE_ENV !== 'production') {
      this.logger.add(
        new winston.transports.Console()
      )
    }
  }

/*
log methods
*/
}
In the above code, we replaced the simple File transport with the DailyRotateFile transport. Here are the additional configurations we applied:
- zippedArchive: Specifies whether to gzip archived log files. (default: ‘false’)
- maxFiles: Sets the maximum number of log files to keep. If not set, no logs will be removed. This can be specified as a number of files or number of days (if using days, add ‘d’ as the suffix). (default: null)
- maxSize: Defines the maximum size of the file after which it will rotate. This can be specified in bytes, or in units of kb, mb, and gb. If using units, add ‘k’, ‘m’, or ‘g’ as the suffix immediately after the number. (default: null)
- datePattern: Represents the date format using moment.js for file rotation. (default: ‘YYYY-MM-DD’)
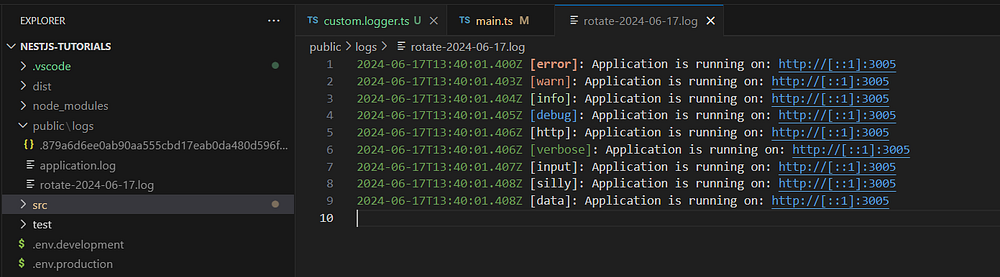
When you run the application, the Winston logger will create a file named rotate-<date>.log and a JSON audit file. You can also customize the date format using formats like 'HH', 'DD', 'SS', and more.
Remove logs in main.ts
// src/main.ts
/* imports */
async function bootstrap() {
  const app = await NestFactory.create(AppModule);

  const configService = app.get(ConfigService);
  // Retrieving the application port from the configuration or using the default value of 3000
  const port = configService.get<number>('app.port', 3000); // Defaults to 3000 if not specified
  await app.listen(port);
  // Logging the application URL to confirm successful startup
  const logger = new WinstonLogger();
  const appUrl = await app.getUrl();
  logger.info(`Application is running on: ${appUrl}`);

}
bootstrap();
Conclusion
Setting up a logger in your NestJS application is straightforward using the built-in logger for basic needs and Winston for advanced logging capabilities. Logging plays a crucial role in monitoring, debugging, and efficiently maintaining applications. By integrating Winston and Winston-Daily-Rotate-File, you gain enhanced control and flexibility over your logging system, particularly beneficial for production-grade applications.
In the next article, we will explore how to define relationships between entities.
To configure MySQL Database with TypeORM, refer to my previous article.
To understand about entities and there relationships, refer to next article.
GitHub Repository:
You can find the complete code for this implementation on GitHub: bhargavachary123
Contribution
If you like my Article, please, consider donating through Buy Me a Coffee: https://buymeacoffee.com/bhargavachary.
If you found this article helpful, please consider leaving a clap (👏) and sharing it with others!
Thanks for reading!